Localize Window
The Localize window may be reached from several windows and dialogue boxes by pressing F7.
Localize As You Go
IntelliWebSearch version 5 is probably the first program in the world users can localize into their own language as they use it. Just press F7 when one of the windows is open and start localizing. Alternatively you can export/import all the interface messages in XLIFF format and localize them in your favourite localization/translation environment tool. Volunteer localizers may also receive complimentary licences in exchange for making their localized interface files available to other users (see details).
The first time the function is called, the Define language parameters dialogue box appears.
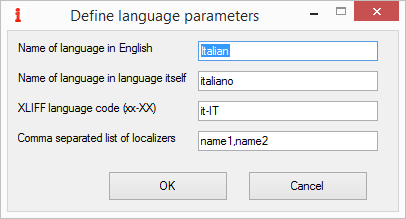
Figure 1 – Define language parameters dialogue box
Options
Name of language in English is the English name of the language you want to localize the interface into, e.g. Czech.
Name of language in language itself is the name of the language you want to localize the interface into in the language itself, e.g. Čeština.
XLIFF language code (xx-XX) is the BCP 47 language tag of the language you want to localize the interface into as implemented by XLIFF Version 1.2, e.g. cs-CZ.
Comma separated list of localizers is a comma separated list of the names of the members of the localization team, e.g. Fred Bloggs, John Doe, John Smith. These names will appear on the About window when the localized interface is used.
Buttons
OK closes the Define language parameters dialogue box and saves any changes you may have made to the settings.
Cancel closes the Define language parameters dialogue box without saving any changes you may have made to the settings.
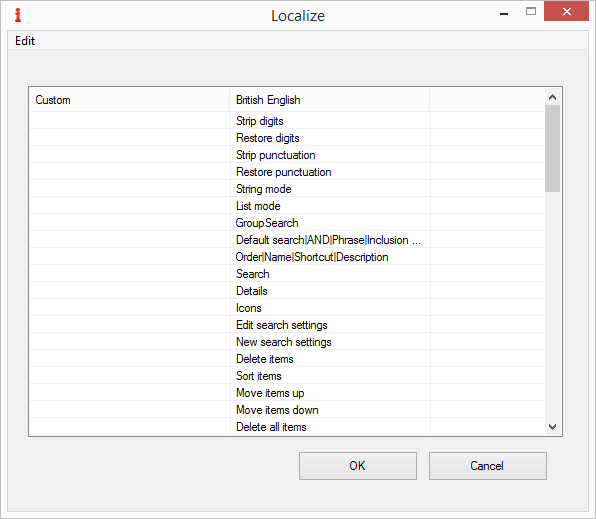
Figure 2 – Localize Window
Menus
Edit
Edit selected item: select this to edit or type in the translation of the interface message selected. Note that the target text is in the left-hand column and the source text in the right-hand column.
Export interface to XLIFF exports all the interface messages, not just those shown, to an XLIFF Version 1.2 file for localization in your favourite localization/translation environment tool.
Import interface from XLIFF imports a previously exported XLIFF Version 1.2 file after localization in your favourite localization/translation environment tool.
Edit description calls up the Define language parameters dialogue box (above).
Context
Edit selected item: select this to edit or type in the translation of the interface message selected. Note that the target text is in the left-hand column and the source text in the right-hand column.
Export interface to XLIFF exports all the interface messages, not just those shown, to an XLIFF Version 1.2 file for localization in your favourite localization/translation environment tool.
Import interface from XLIFF imports a previously exported XLIFF Version 1.2 file after localization in your favourite localization/translation environment tool.
Edit description calls up the Define language parameters dialogue box (above).
Columns
Custom is the target column where the localized interface messages are shown and may be edited. Any empty items are automatically replaced with the British English version if the localized interface is used.
British English is the source column where the original language version of the interface messages is shown.
The messages shown are those that are related in some way to the window or dialogue box from which the Localize Window is called (using F7). The easiest way to get a complete list of interface messages is to export them all to an XLIFF Version 1.2 file (see above).
Buttons
OK closes the Localize Window and saves any editing you may have done to the localized interface. If you have not previously chosen to do so, IntelliWebSearch asks if you would like to switch immediately to the new localized interface. Any messages you have not yet localized are shown in British English.
Cancel closes the Localize Window without saving any changes you may have made to the localization.
From the Localize Window you can also:
- Press F1 for context-sensitive help.
- Press F2 when any item is selected to edit that item.